
6 métodos principais para alterar letras maiúsculas para minúsculas
Existem muitos métodos usando os quais você pode alterar o texto de letras maiúsculas para minúsculas no Excel. Neste guia, examinaremos os 6 principais métodos para transformar letras maiúsculas em minúsculas em detalhes.
# 1 Usando a função inferior para alterar maiúsculas e minúsculas no Excel
Existe uma função embutida no MS Excel para decapitalizar cada caractere em uma palavra, que é uma função INFERIOR .
Exemplo
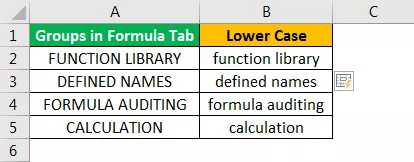
Suponha que temos uma lista de alguns verbos no excel, queremos mudar o caso do texto para minúsculas.

Para mudar o caso para inferior, precisamos escrever a função na célula C2 como '= LOWER (A2)'. ”= 'Ou' + 'é usado para escrever a função, ' LOWER ' é o nome da função e A2 é a referência de célula para o texto para o qual queremos mudar a caixa.

Pressione Enter e esta função irá converter todas as letras em uma string de texto em minúsculas.

Um valor é convertido agora. Para outros valores, podemos pressionar Ctrl + D após selecionar todas as células com a célula superior ou pressionar Ctrl + C e Ctrl + V para copiar e colar a função. Ou podemos arrastar a fórmula em outras células para obter a resposta.

# 2 Usando o botão de comando VBA
Podemos criar um botão de comando VBA e atribuir o código para alterar o texto a seguir para minúsculas usando o botão de comando.

Exemplo
Passo 1: Para criar o botão de comando, clique no comando 'Inserir' no grupo 'Controles' na 'guia Desenvolvedor Excel.' E selecione o 'Botão de comando'.

Etapa 2: Clique no local da planilha em que deseja que o botão de comando apareça. Podemos redimensionar o botão de comando usando o botão ALT .

Etapa 3: usando o comando 'Propriedades' , altere as propriedades do botão de comando como legenda, nome, AutoSize, WordWrap, etc.


Passo 4: Agora, para atribuir o código ao botão de comando, clique no comando 'Ver Código' no grupo 'Controles' em 'Desenvolvedor' Certifique-se de que o 'Modo Design' esteja ativado.

Etapa 5: Na janela aberta, selecione 'ConvertToLowerCase' na lista suspensa.

Etapa 6: cole o código a seguir entre as linhas.
Código:
Dim Rng As Range Dim c As Range On Error Resume Next Set Rng = Seleção Para Cada c In Rng c.Value = LCase (c.Value) Próximo c

Etapa 7: Saia do editor visual básico. Certifique-se de que o arquivo seja salvo com a extensão .xlsm, pois temos uma macro em nossa pasta de trabalho.
Etapa 8: Desative o 'Modo Design' . Agora, após selecionar as células desejadas, sempre que clicarmos no botão de comando, os valores serão convertidos para minúsculas.
Selecione todos os valores de A2: A10 e clique no botão de comando. O texto será alterado para minúsculas.

# 3 Usando a tecla de atalho VBA
Esta forma é semelhante à anterior, exceto pelo fato de que não precisamos criar o botão de comando aqui.
Exemplo
Etapa 1: Abra o editor do Visual Basic na guia 'Desenvolvedor' ou usando a tecla de atalho do Excel (Alt + F11) .

Etapa 2: Insira o módulo usando o Menu Inserir -> Comando do Módulo .

Etapa 3: cole o código a seguir.
Sub LowerCaseConversion() Dim Rng As Range Dim c As Range On Error Resume Next Set Rng = Selection For Each c In Rng c.Value = LCase(c.Value) Next c End Sub

Step 4: Save the file using Ctrl+S. Exit the visual basic editor. Make sure the file is saved with .xlsm extension as we have a macro in our workbook.
Step 5: Now choose the ‘Macros’ in the ‘Code’ group in the ‘Developer’ tab.

Step 6: Then click on ‘Options’ and assign the shortcut key to the Macro, and we can write a description as well.

In our case, we have assigned Ctrl+Shift+L.

Step 7: Macro is ready to use. Now to change the values into lowercase, select the required cells, and press Ctrl+Shift+L.

#4 Using Flash Fill
If we establish a pattern by typing the same value in the lowercase in the adjacent column, the Flash Fill feature will fill in the rest for us based on the pattern we provide. Let us understand this with an example.
Example
Suppose we have the following data, which we want to get in lowercase.

To do the same, we need to write the first value of the list in the lower case manually in the adjacent cell.

Come to the next cell in the same column and just press Ctrl+E.

Choose ‘Accept Suggestions’ from the box menu appeared.

That is it. We have all the values in the lower case now. Now we can copy the values, paste the same onto the original list, and delete the extra value from the right.
#5 Enter Text in Lower Case Only
We can make a restriction so that the user can enter text values in lowercase only.
Example
To do this, the steps are:
- Select the cells which you want to restrict.
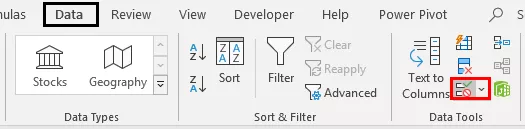
- Choose ‘Data Validation’ from the ‘Data Tools’ group from the ‘Data’ tab.
- Apply the settings explained in the figure below.


- Now, whenever the user enters the value in capital letters, MS Excel will stop and will show the following message.

#6 Using Microsoft Word
In Microsoft word, unlike Excel, we have a command named ‘Change Case’ in the ‘Font’ group in the ‘Home’ tab.
Example
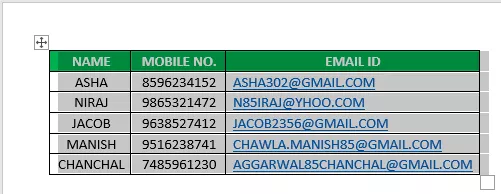
Suppose we have the following table of data for which we want to change the text case to ‘Lower’ Case.

To change the case, first, we will copy the data from MS Excel and paste it into MS Word. To do the same, the steps are:
Select the data from MS Excel. And press Ctrl+C to copy data from MS Excel.

Open the MS Word application and paste the table using the Ctrl+V shortcut key.

Select the table using the ‘Plus’ sign on the left-top side of the table.
Choose the ‘Change Case’ command from the ‘Font’ group and select ‘lowercase’ from the list.

Now, the data table is converted to ‘Lower.’ We can just copy the table after selecting the ‘Plus’ sign from the left top corner and paste it into Excel back.
Podemos excluir a tabela antiga usando o menu contextual, que podemos obter clicando com o botão direito na tabela.

Coisas para lembrar
Para converter os valores em minúsculas, se usarmos o código VBA (botão de comando ou tecla de atalho), precisamos salvar o arquivo com a extensão .xlsm, pois temos macros na pasta de trabalho.


